Rah AFzar Tarh
Company overview
Products
Contents
Training Videos
Free Stuff
Site Map
Contact us
Support services
Home page
|
|
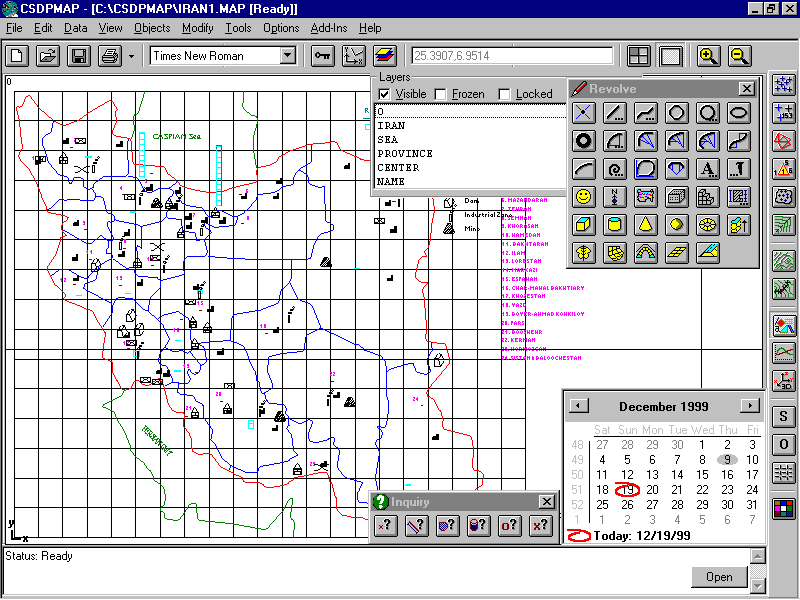
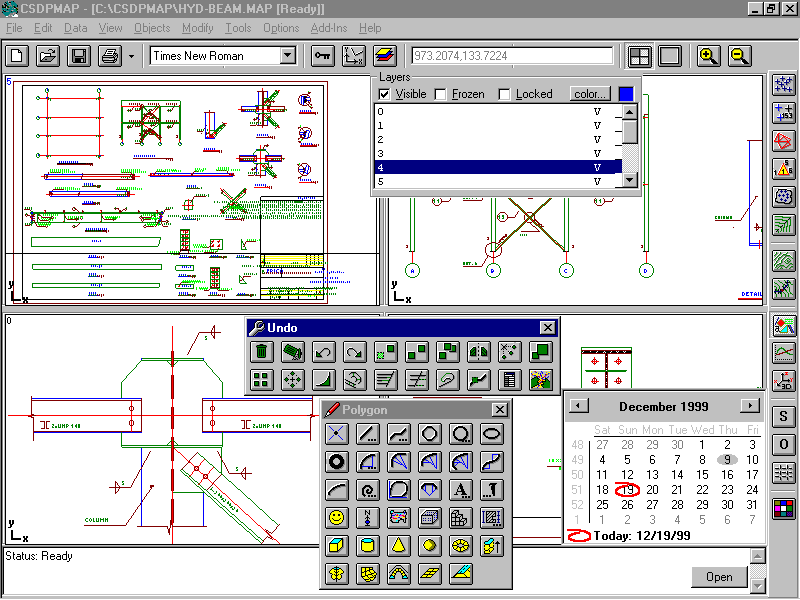 Although, CSDPMAP is fully capable of CAD drafting either in 2D
or 3D space, and also prints out the drawings in full scale; however,
it is possible to import AutoCAD drawings into CSDPMAP, and export
CSDPMAP projects to AutoCAD via DXF file format. In the next pages,
some examples of the drawings which are originally have created
in AutoCAD, and are imported into CSDPMAP are presented.
Although, CSDPMAP is fully capable of CAD drafting either in 2D
or 3D space, and also prints out the drawings in full scale; however,
it is possible to import AutoCAD drawings into CSDPMAP, and export
CSDPMAP projects to AutoCAD via DXF file format. In the next pages,
some examples of the drawings which are originally have created
in AutoCAD, and are imported into CSDPMAP are presented.
All drawing properties, such as layers, linetypes, colors, etc. can be transported
between the two system. Only for the font of Text objects, CSDPMAP
works based on the Windows True-Type fonts.
Almost all objects created in AutoCAD can be imported into CSDPMAP; such as lines, polylines,
...; and even hatches, dimensionings, blocks, etc.
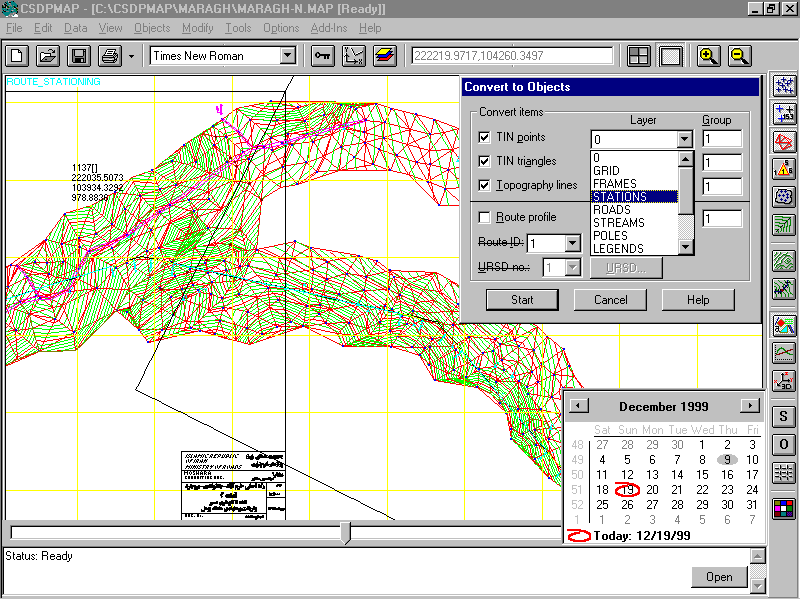
All the other CSDPMAP drawing items, such as TIN points, TIN triangles, contour
lines, etc. can be exported to AutoCAD too. In case of exporting
TIN triangles, each triangle forms a 3d face in AutoCAD.
It is possible to export all 3d objects of CSDPMAP to AutoCAD and vice versa too.
For a 3D Route object, CSDPMAP creates necessary mesh entities to
resemble the route, and exports it to AutoCAD.

Because AutoCAD is one of the most popular CAD systems used in
the world, CSDPMAP mimics AutoCAD. This is not only limited to the
drawing or editing commands, but also, it is designed in such a
way, to resemble the same navigation environment. The mouse/keyboard,
for example, act almost similarly in both systems.
For drawing a polyline, for example, you can start by selecting the polyline tool
from the toolbar, or select the corresponding option from the pull-down
menus, or the easiest way, type the POLYLINE command (or its alias
PL) in the Status/Command window. To enter point's coordinates,
you can type the values, or you can pick a point, using your pointing
device. To terminate the command, you can either press the Enter
key, or use the right mouse button; exactly like AutoCAD.
While defining points, you can use the object snaps; again you can select the interested
object snap from the pop-up menu, which is activated by using the
right mouse button and the Shift key at the same time. The choices
you have for object snaps are End, Middle, Center, Perpendicular,
Intersection, Bisect, Insert, Quadrant, Tangent, Nearest.
|
| Back to Top
|
Using right mouse button at the same time with Shift key activates the TIN related pop-up menus.
Besides the drawing commands, you can find them in AutoCAD too, CSDPMAP has its own set of drawing commands, for example, Nuclear line command, and Ruler polyline command;
Selecting objects can be done via various methods, such as All, Previous, Last, by type, by color, by group, window, and cross.
To use selecting commands, you can use the right mouse button along with the Shift key at the same time to activate the selection pop-up menu. Notice, that, depends on the stage of a command in progress, the above key combination, activates the Selection pop-up menu or the Object snap pop-up menu.
Using the right mouse button with the Alt key at the same time, activates one of the TIN points pop-up menu, TIN triangle pop-up menu, TIN boundaries pop-up menu, or TIN break lines pop-up menu, depends on what stage you are working in.
TIN points pop-up menu consists of the options for: Add TIN point, Disable TIN point, Enable TIN point;
TIN triangle pop-up menu consists of the options for: Disable TIN triangle, Enable TIN triangle, Swap TIN triangles;
TIN boundaries pop-up menu consists of the options for: Set boundary line, Disable/Enable
boundaries, Erase boundaries;
TIN break lines pop-up menu consists of the options for: Set break line, Disable break line,Enable break line;
For zoom and pan operations, the commands, Zoom All, Zoom Previous, Zoom Extents, Zoom Magnify, and Zoom Reduce, are considered in the system.
However fornormal zoom and pan operations, CSDPMAP has not a specific command, because
these operations are built in to the mouse functionality, and acts
independently or transparently when another drawing or editing command is in
progress.In comparison with AutoCAD, this is the most convenient system
known for the zoom and pan operations.
But in drawing circular curves, spirals, and other similar objects, you must work in
CSDPMAP, to see how interactively it draws objects, as you move your pointing
device, not comparable with any other CAD application.
Another feature, fully enriched in CSDPMAP is working with
Text objects. Supporting True-Type fonts of Windows; along with any arbitrary
font size, font shape, such as bold, italic, underline, strikethru; and text
justification styles (left, right center), text transparency/opaque, along
with defining the text background color in case of an opaque condition; all
give you the possibility to add more to your drawings.
When entering texts, just in the middle of the command, you can change the font, and the
insertion point.
To draw accurately,you have options using Grid, Snaps, Object snaps, and Ortho modes; you can
change the UCS (User coordinates system); you can use both the absolute and
relative coordinates systems for entering points; you can use Cartesian and
polar systems; and more. The keys F6, F7, F8, F9 have the same functionality
as AutoCAD.
|
| Back to Top
|
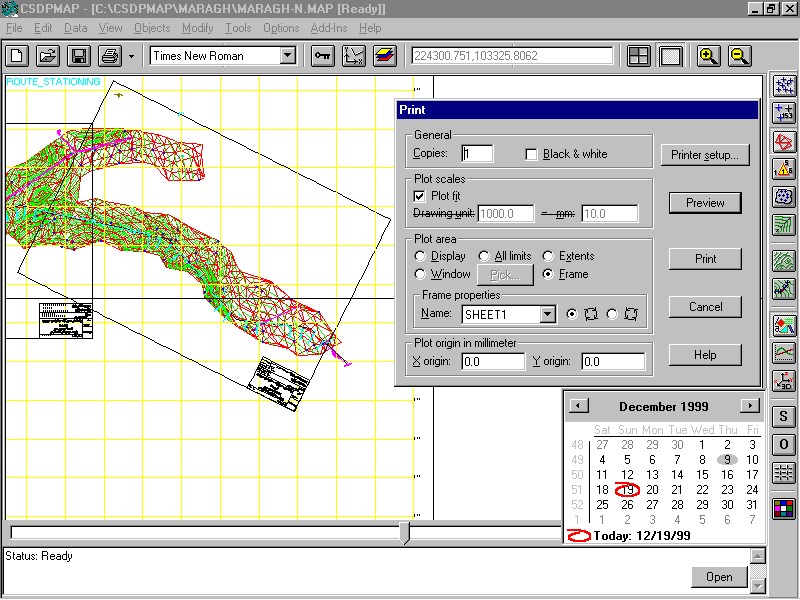
Printing is as easy as redrawing in CSDPMAP; you can apply scales just as you do in AutoCAD; Drawing units=mm.
The printing is done via Windows Print Manager; thus any type of printer is supported. Besides, instead of printing directly, you can export your drawings via DXF files to AutoCAD.
For printing, you can define the print range, again as you do in AutoCAD; Display, Window, Extents, etc.
Above all these, CSDPMAP has a special windowing feature named Frame for printing. Just draw a rectangular polyline and assign it a unique name.
Now in Print dialog box, select the appropriate frames name, and CSDPMAP rotates the frame in clockwise or counterclockwise direction (based on your choice), to set its position for printing.
Try to print the rectangular region shown in figure, in AutoCAD, to know, how CSDPMAP simplifies the task of printing for you.
|
|